Restoring Backups
This guide explains how restore operations work in practice, not just which buttons to click.
It covers:
- the checks that happen before restore,
- the difference between normal and advanced restore modes,
- config-specific and image-specific behaviour,
- what the progress and completion screens mean,
- and what to verify afterwards.
Start a restore
- Go to System > Backups.
- Find the backup you want in the table.
- Click the Restore icon on that row.

Screenshot: Restore icon in a backup row.
The restore dialog opens and begins loading the backup metadata and running the initial checks.
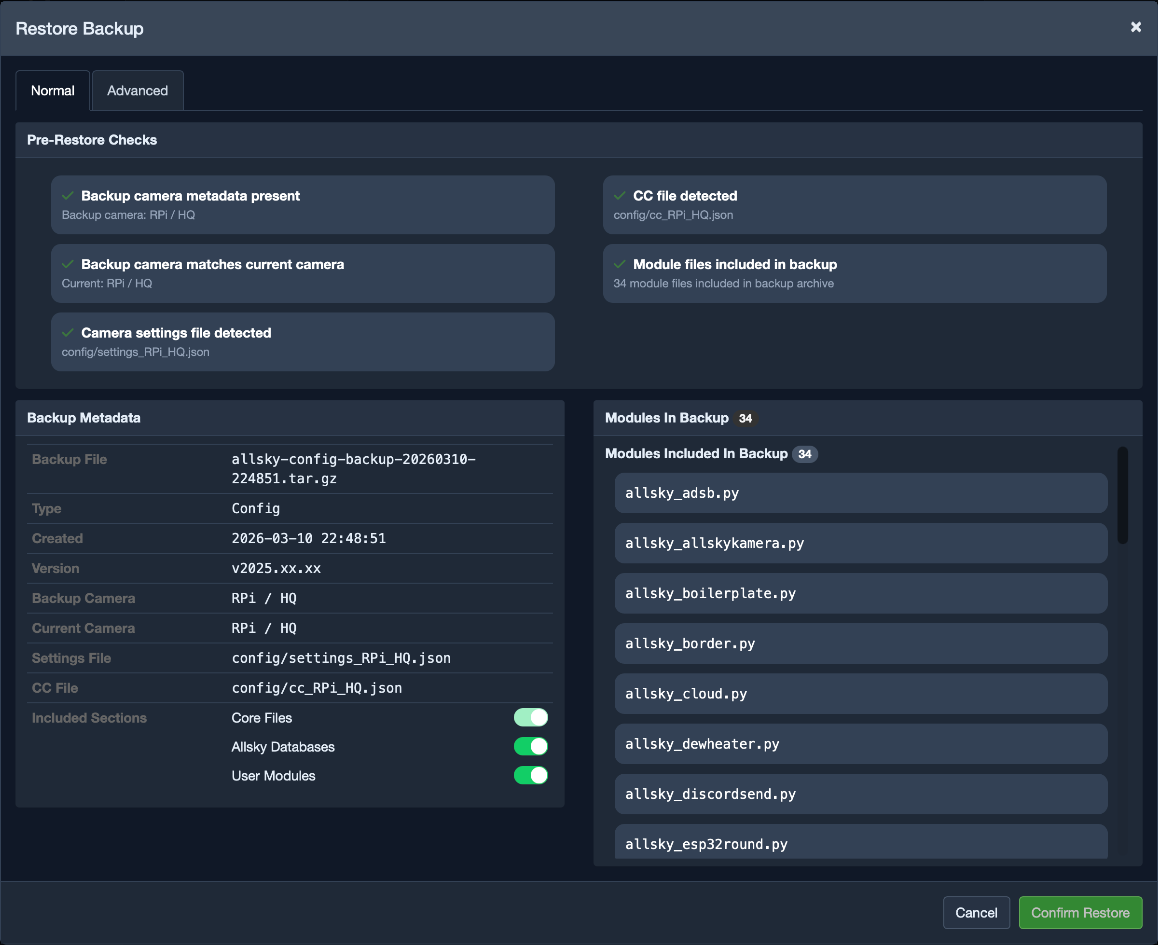
What the restore dialog shows
The restore dialog is laid out to answer four questions:
- Is this backup valid for restore?
- What does the backup contain?
- What exactly are you going to restore?
- Is the current selection safe to proceed with?
You will typically see these sections:
- Pre-restore checks
- Backup metadata
- Content panel
- Mode tabs for Normal and Advanced
Screenshot: Restore dialog with checks, metadata, and mode tabs.
Understanding the pre-restore checks
The checks are there to stop bad restores before they happen.
Depending on the backup type and your restore selection, Allsky may check:
- whether the backup metadata is valid,
- whether the camera is compatible,
- whether required modules are available,
- whether the selected folders or files are valid,
- and whether the current section selection makes sense.
Each check shows:
- a green pass icon or a red fail icon,
- and text explaining what was tested.
Warning
If a blocking check fails, the restore confirmation button stays disabled until the problem is resolved.
That is intentional. The goal is to prevent partial or invalid restores, not just warn about them afterwards.
Normal mode and Advanced mode
Allsky offers two restore modes because not every recovery task is the same.
Normal mode is the recommended choice for most restores.
It is designed for broader, safer recovery tasks:
- For a Config backup, you choose which included sections to restore.
- For an Images backup, you choose which folders to restore.
This mode is usually faster to work with and less likely to lead to accidental omissions.
Advanced mode is for targeted recovery.
It shows a file tree with:
- collapsible folders,
- search,
- select-all and select-none controls,
- and parent-child checkbox behaviour.
Use this mode when you only need a small part of the backup, such as a few files or a very specific folder.
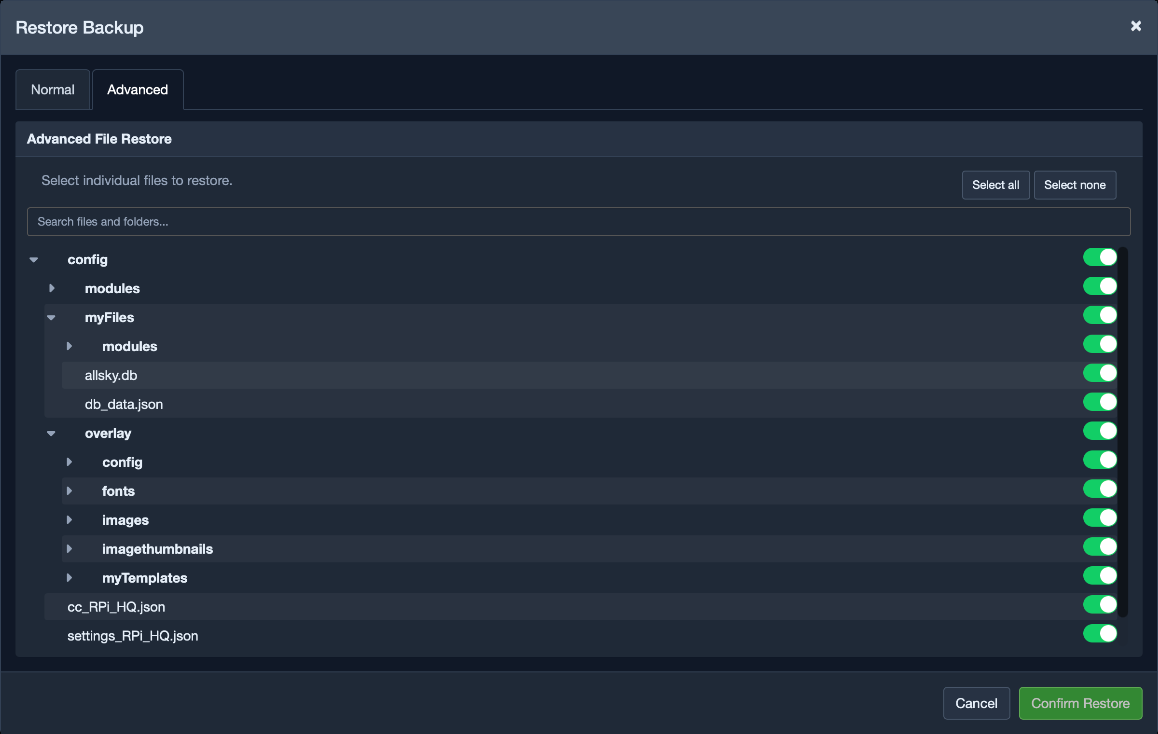
Screenshot: Advanced mode file tree with search and hierarchical selection.
Which mode should you choose?
Use Normal mode unless you have a clear reason to restore only a subset of files. Use Advanced mode when you want a narrower, more surgical restore.
Config restore behaviour
Config restores are handled carefully because they can replace active files that Allsky is currently using.
For config restores, Allsky performs a controlled sequence:
- Stop the
allskyservice. - Extract the selected restore targets.
- Restore camera-aware links such as
settings.jsonandcc.json, where required. - Reapply owner, group, and mode information from the stored metadata.
- Start the
allskyservice again.
This is deliberate. It helps keep the restored configuration consistent instead of mixing live state with partially replaced files.
Camera compatibility rule
Config restores are camera-safe.
If the camera type or camera model stored in the backup does not match the current system, the restore is blocked.
That prevents a configuration intended for one camera from being applied to a different one.
Module availability rule
Module validation depends on what you chose to restore:
- If module files are included in the restore selection, module presence checks are relaxed.
- If module files are not being restored, Allsky validates that the required modules already exist locally.
This helps avoid ending up with a restored configuration that points to modules the current system does not have.
Images restore behaviour
Images restores are more flexible because you may want either a broad recovery or a very specific one.
You can restore:
- complete image folders,
- or individual files in Advanced mode.
Where metadata is available, ownership and permission information is reapplied after extraction.
That helps keep restored content consistent with the rest of the image storage layout.
Confirming the restore
When the checks pass and your selection is valid, click Confirm Restore.
At that point, the restore begins and a progress modal opens.
Restore progress modal
The progress modal gives you stage-by-stage feedback while the restore runs.
Typical steps include:
- validating the selected options,
- extracting the chosen content,
- applying permissions,
- and finalizing the restore.
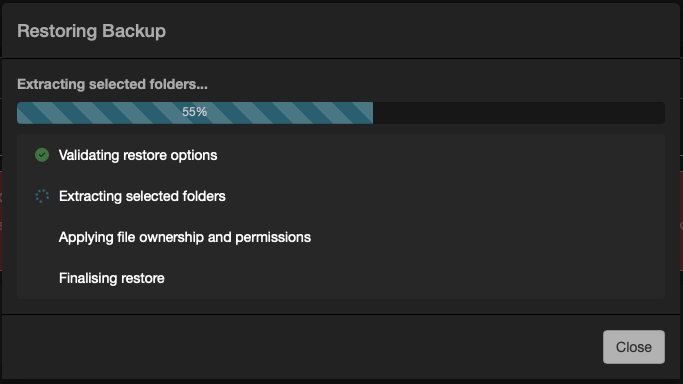
Screenshot: Restore progress modal while restore is running.
Note
Large restores, especially image restores, can take time. The interface may appear to pause between stages while extraction is still in progress.
Restore completion modal
When the restore finishes successfully, Allsky displays a completion summary so you can see exactly what happened.
The summary can include:
- the backup file, type, and restore mode,
- the source and target Allsky versions,
- the source and target camera details for config restores,
- the sections restored,
- the files restored,
- the restore log path,
- and any warnings that were generated.
For image restores:
- if you restored whole folders, the folder names are shown,
- if you restored individual files, the restored file list is shown.
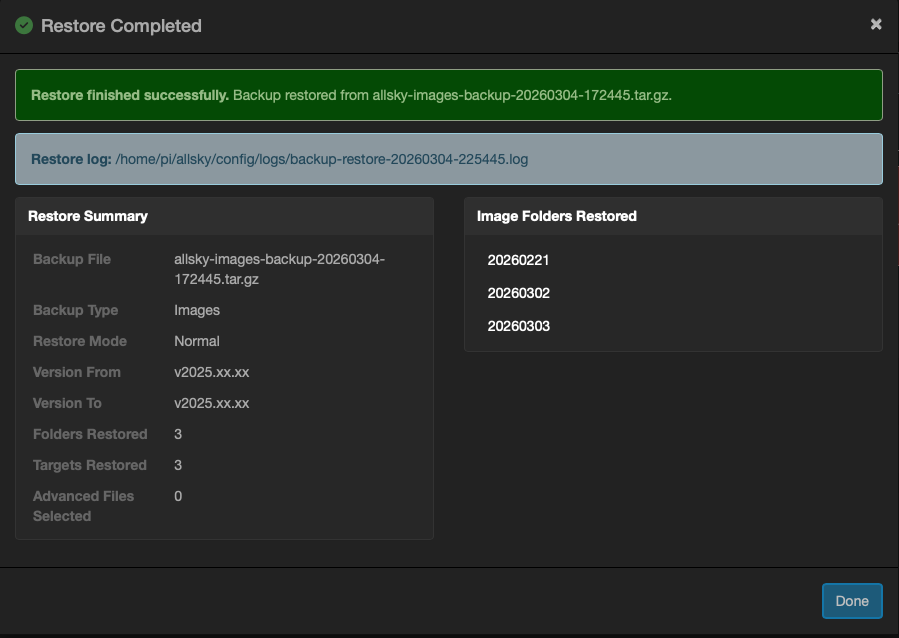
Screenshot: Restore complete summary modal.
Restore logs and traceability
Every restore writes a log file to config/logs using a name like:
backup-restore-YYYYMMDD-HHMMSS.log
The log gives you a permanent record of:
- what you selected,
- what was restored,
- which stages ran,
- the version and camera context,
- and any warning information.
Tip
If you are diagnosing issues after a rollback or after a targeted file restore, keep the restore log. It provides a reliable record of exactly what changed.
What to check after a restore
After restoring, verify that the system is behaving the way you expected.
Use this checklist:
- The WebUI loads normally.
- Service status looks healthy.
- Key settings match the expected state.
- Modules and the pipeline behave correctly.
- New image capture and processing are functioning.
If you used Advanced mode to restore only a small part of the system, test that exact component rather than assuming everything is fine.
Recommended restore strategy
- Use Normal mode for most restores.
- Use Advanced mode only when you need a targeted recovery.
- Prefer the most recent known-good backup, not simply the newest one.
- Review both the completion summary and the restore log immediately after the restore.