Module Package Manager
The module package manager is the part of Allsky that installs, updates, and removes optional modules from your system. It is the place where modules are brought into Allsky. The regular Module Manager then takes over and lets you decide where those modules should run, in what order they should run, and how they should be configured.
That distinction is easy to miss when you first start using modules, but it is the key to understanding how the system works. Installing a module does not make it run automatically. It only makes the module available inside Allsky. After the installation finishes, you still need to open the Module Manager, add the module to the correct pipeline, enable it, and save the pipeline.
The short version
The package manager installs the module. The Module Manager decides when and where the module runs.
A very common mistake
If you install a module and then expect it to start working immediately, nothing may appear to happen. In most cases the installation succeeded, but the module has not yet been added to a flow.
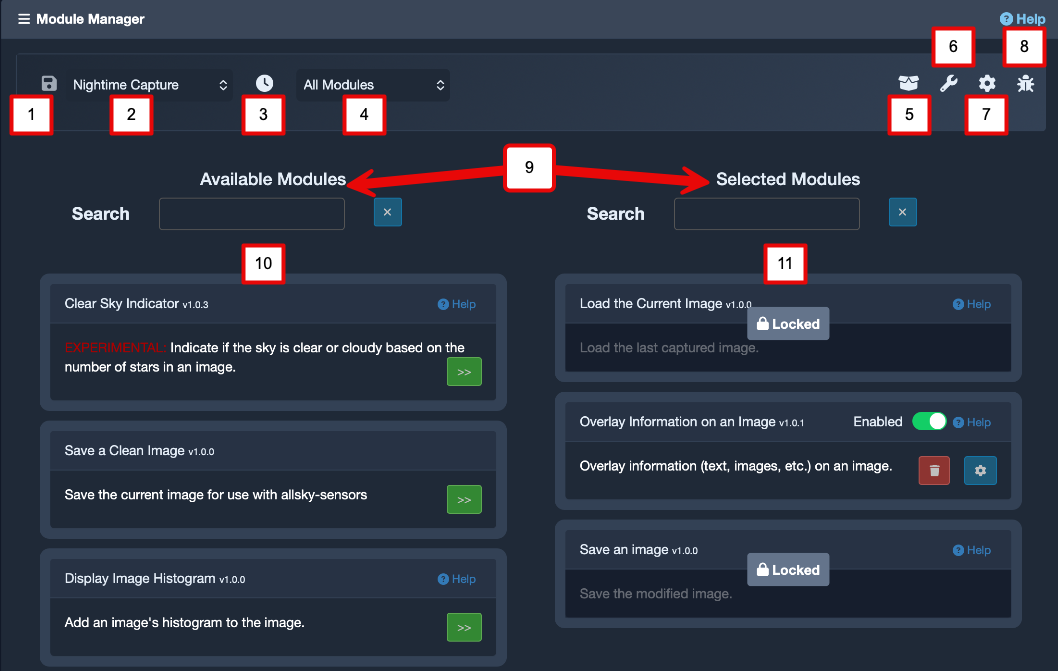
The main Module Manager. The package manager installs modules; this screen is where you add them to a pipeline and configure how they run.
What The Package Manager Is For
Core modules that ship with Allsky are already present and do not normally need to be installed with the package manager. The package manager is mainly for optional and user modules that add extra features such as hardware support, additional data sources, image processing, or export functions.
When you install a module, Allsky does much more than copy a single Python file into place. The package manager checks the module metadata, copies the module code, and also copies any extra files the module needs. Depending on the module, that may include blocks for the Variable Manager, charts for history displays, supporting data files, installer information, and documentation files. If the module declares Python packages or apt packages as dependencies, the package manager will attempt to install those as part of the process. Some modules also run a post-install step so they can prepare data or finish their setup automatically.
This is why the package manager is the supported way to add modules. It understands the full structure of a module and places each part in the correct location inside your Allsky installation. Copying files manually can leave the module only half installed, which often leads to confusing problems later when you try to enable it in a pipeline.
The package manager also knows how to tell whether a module is already installed, whether a newer version is available, and whether a module has been deprecated. In normal use, deprecated modules are hidden from the install list so that new systems are not built around older modules that are being phased out.
At A Glance
-
Install
Use the package manager to bring a new optional module into Allsky, including its dependencies and support files.
-
Update
If a newer version is available, the package manager refreshes the module files and related data.
-
Uninstall
Remove the module and the folders created for it when you no longer need it.
-
Then Add To A Flow
After installation, open the Module Manager and place the module into the correct pipeline.
Before You Start
Before opening the package manager, it is worth stopping for a moment and deciding what you want the module to do. Some modules generate values that can be shown in overlays. Others talk to hardware connected to the Pi. Others work directly on the image itself. If you know what role the module is meant to play, it becomes much easier to choose the right pipeline afterwards.
You should also keep in mind that user modules should come from the official Allsky modules repository. That is the source the package manager is designed to use. Pulling in random code from elsewhere may not only fail to install cleanly, it can also create a genuine security risk on the machine that is running your camera.
If a module depends on hardware, make sure the hardware is actually connected and supported before you spend time configuring the software. The package manager can install files and dependencies, but it cannot fix wiring errors, missing sensors, or incompatible boards.
Before you click install
Read the module description carefully, think about which pipeline it belongs in, and check whether it needs hardware, network access, API credentials, or other preparation.
Opening The Package Manager
The package manager is presented as a simple installer-style interface. Its job is deliberately narrow: it helps you review the modules that are available, install new ones, update existing ones, and remove modules you no longer want.
The first screen is usually a short welcome message explaining what modules are and asking whether you want to continue. After that, the main menu gives you the actions that are relevant to your system. On a system with no optional modules installed, the menu may be very short. Once you have modules installed, you will normally see options to install and uninstall modules. In debug mode there may also be advanced maintenance options such as switching the repository branch.
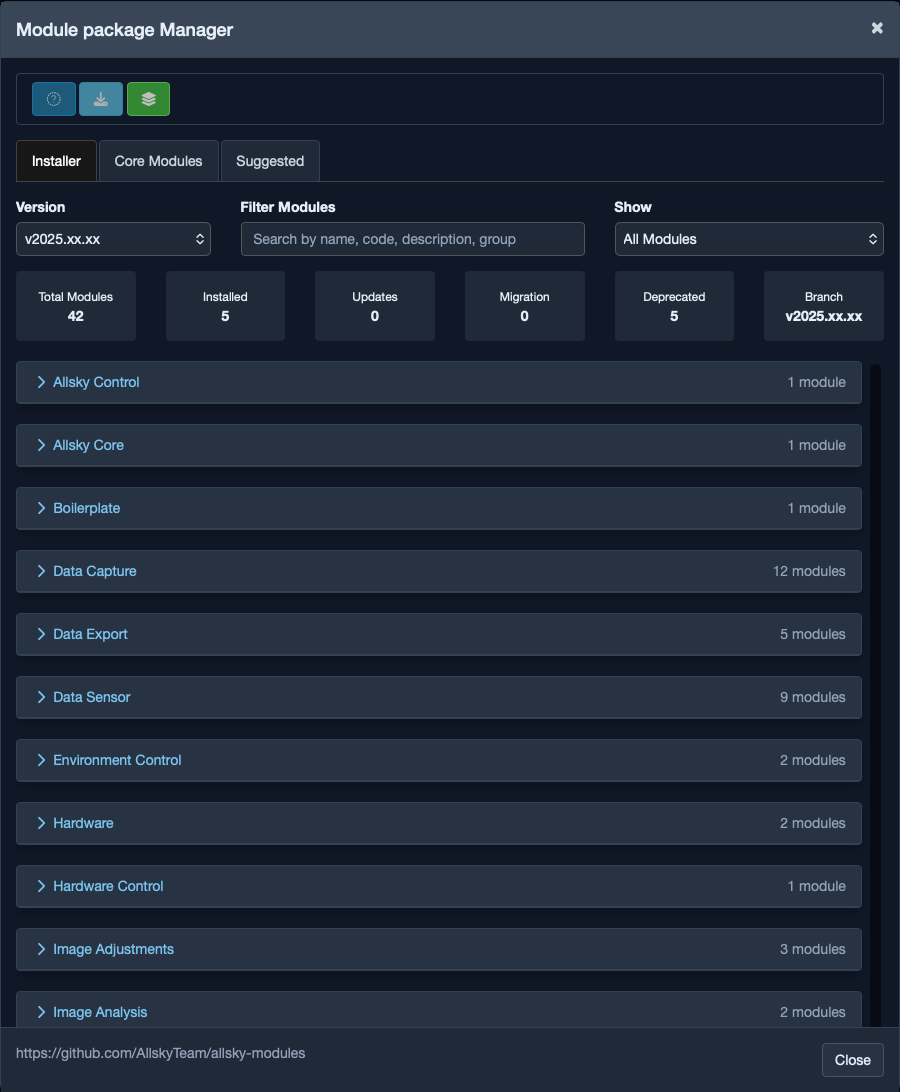
The Allsky Modules Package Manager.
The Normal Workflow
The easiest way to think about the package manager is as the first half of the process. The second half happens in the Module Manager.
| Step | What you do | Why it matters |
|---|---|---|
| 1 | Install the module with the package manager | This copies the code, support files, and dependencies into Allsky |
| 2 | Open the Module Manager | This is where the installed module becomes available for use |
| 3 | Add the module to the correct pipeline | Modules only run when they are part of a flow |
| 4 | Configure the module settings | Many modules need values such as device details, API keys, or behaviour options |
| 5 | Enable the module and save the flow | The module does not become active until the flow is saved |
| 6 | Test or verify the result | This confirms that the installation and the pipeline setup are both correct |
Think in two stages
A successful installation only tells you that the module is present on disk and ready to use. A successful pipeline setup is what makes the module actually do something.
Installing, Updating, And Removing Modules
Installing a module is usually straightforward. Start by choosing the install option. The package manager reads the official module repository and builds a list of available modules. Each entry includes the module description and, where relevant, its status. A module might be shown as already installed, as having an update available, or as deprecated.
It is worth taking your time at this point. The description is often the quickest way to avoid installing the wrong module. Some modules sound similar but solve different problems. One may expose sensor data for overlays, while another may actively control hardware using those readings.
Once you have selected a module, the package manager carries out the installation for you. In the background it validates the module, copies its files into the correct Allsky locations, installs dependencies if they are required, and runs any module-specific post-install tasks. If the module includes charts, blocks, or supporting data, those are installed as part of the same process.
When the installation completes successfully, the module becomes available inside the regular Module Manager. That is the point where you move on to flow configuration.
The package manager can also update modules that are already on your system. If the repository contains a newer version than the one you have installed, the module is marked as having an update available. In practice, the update process looks very similar to a fresh installation, because Allsky needs to refresh the module files and any related data.
An update is not only about new features. It can also include bug fixes, compatibility changes, dependency updates, or metadata changes that affect how the module appears in the Module Manager. In some cases the package manager may also migrate module-related data so that your existing configuration continues to work with the newer release.
Even when an update appears routine, it is sensible to check the module settings afterwards. Most updates will preserve your configuration, but if a setting has been renamed, replaced, or removed by the module author, you may need to review the module in the Module Manager and save the flow again.
Uninstalling a module is also handled by the package manager. Choose the uninstall option, select the module you want to remove, and let Allsky clean up the files it installed for that module. This removes the module code as well as the related data folders that were created for it.
Before you uninstall a module, think about where it is being used. If the module is still present in one of your flows, or if an overlay depends on variables created by that module, removing it may leave you with broken pipeline steps or empty fields in your overlays.
If your goal is only to stop a module temporarily, do not uninstall it. It is usually better to leave it installed and simply untick its Enabled option in the Module Manager. That preserves the settings and makes it easy to turn the module back on later.
After installing or updating a module, open its settings and confirm that everything still looks correct.
After Installation: Put The Module To Work
The most common misunderstanding is expecting the package manager to do everything automatically. It does not. Its responsibility ends once the module is installed on disk and ready for use. To make the module actually run, you need to move over to the Module Manager and place it into the right pipeline.
For example, a module that changes the image itself usually belongs in the Daytime or Nighttime pipeline, depending on when you want it to run. A module that sends a summary or final files might belong in a transition pipeline. A module that checks external data every few minutes may belong in the Periodic pipeline. Choosing the wrong pipeline is one of the easiest ways to make a working installation look broken.
The order of modules in a pipeline is just as important as the installation itself. A module that produces data for overlays needs to run before the overlay module. A module that changes the image must run before the image is finally saved. If the order is wrong, the package manager will still report a successful installation, because the installation itself was successful. The real problem is then in the pipeline design.
Pipeline order matters
If a module generates data for another module, install order is irrelevant but run order is critical. A correctly installed module can still appear broken if it sits in the wrong place in the flow.
What To Check In Module Settings
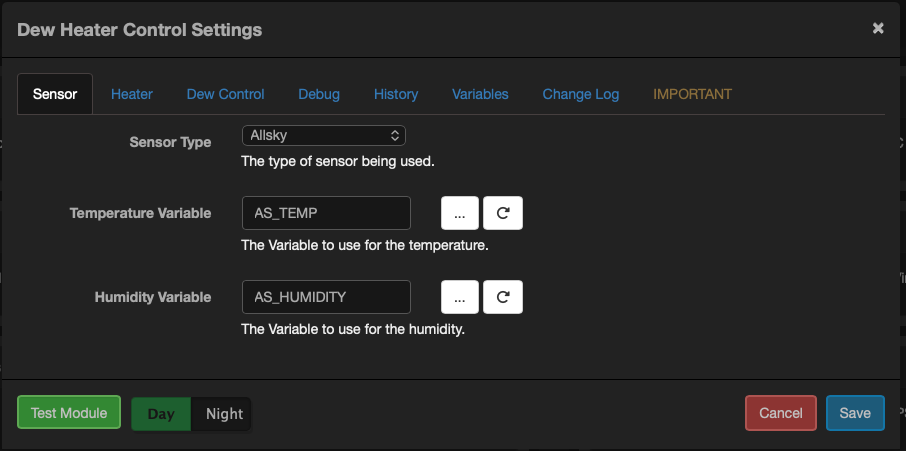
Once a module has been installed and added to a flow, its settings dialog becomes the main place to confirm that it is behaving as expected. The exact options depend on the module, but a few tabs appear often enough that they are worth understanding.
The Variables tab shows which values the module exports to the rest of Allsky, especially to overlays. This is the tab to check when a module appears to be running but the overlay is still blank. If the variable you expect is not listed, the problem is usually with the module configuration, the pipeline placement, or the module itself.
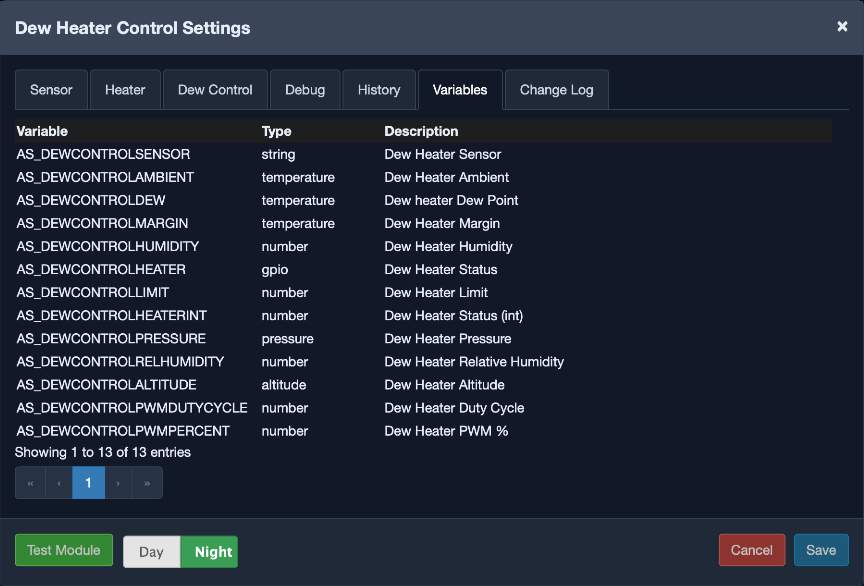
The Variables tab is useful after installation because it shows what data a module makes available to overlays.
If a module provides charts, the History tab lets you see whether it is actually producing live data over time. This is especially helpful for hardware and sensor modules, because it gives you a quick visual check that data collection is happening normally.
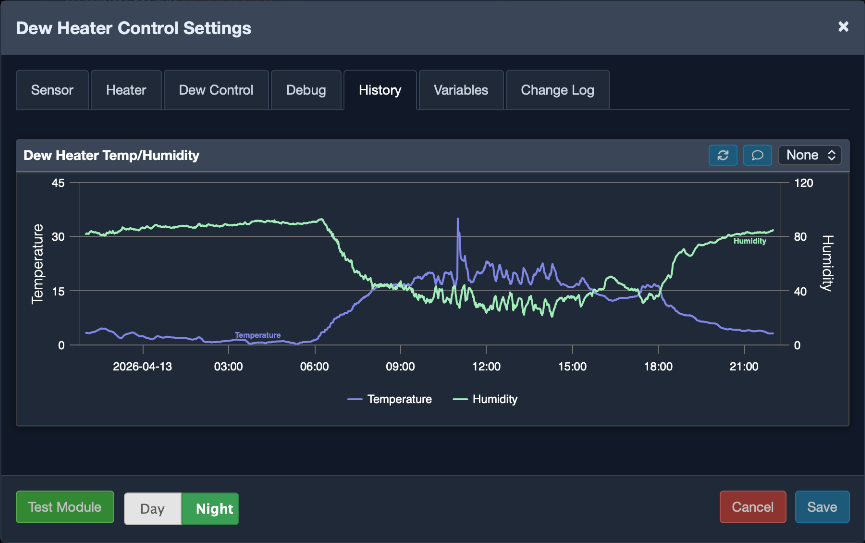
If a module provides charts, the History tab lets you confirm that it is producing live data after you have enabled it in a flow.
The Changelog tab helps you understand what changed between releases. This is particularly useful after an update, when the module still runs but no longer behaves exactly as you expected.
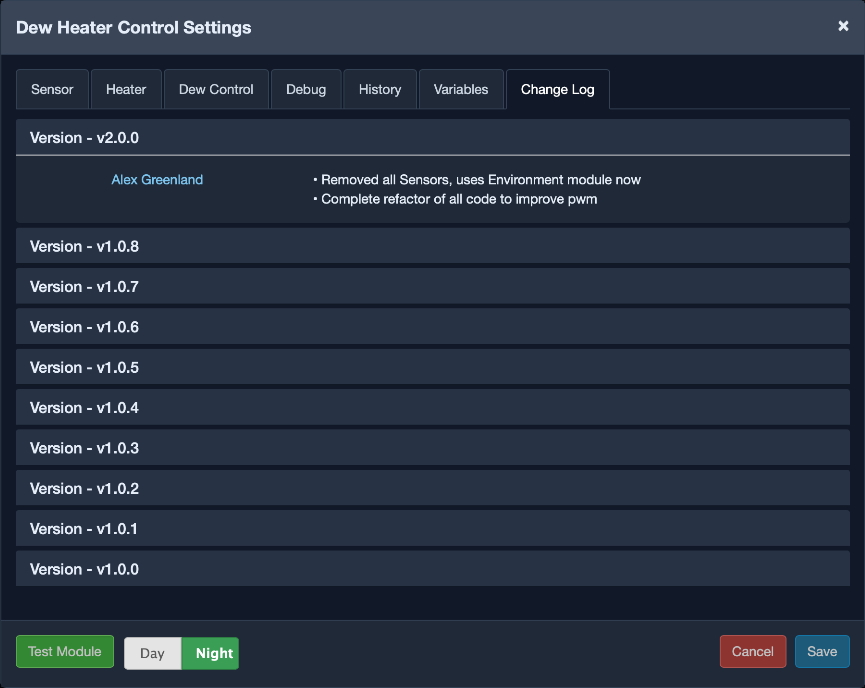
The Changelog tab can explain why a module behaves differently after an update.
If a module has been deprecated, the Important or deprecation tab explains the situation and may point you to a replacement. Treat this as a sign that you should plan a move rather than building new workflows around that module.
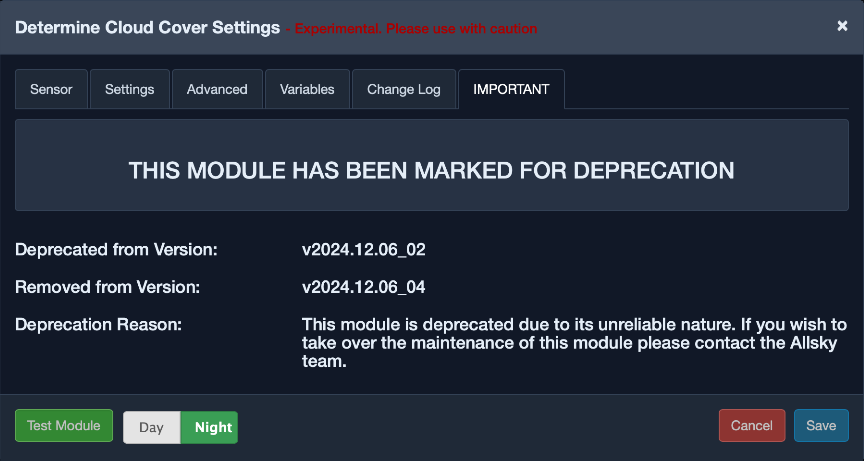
If a module is deprecated, this tab explains the situation and may point you to a replacement.
Testing A Module After Installation
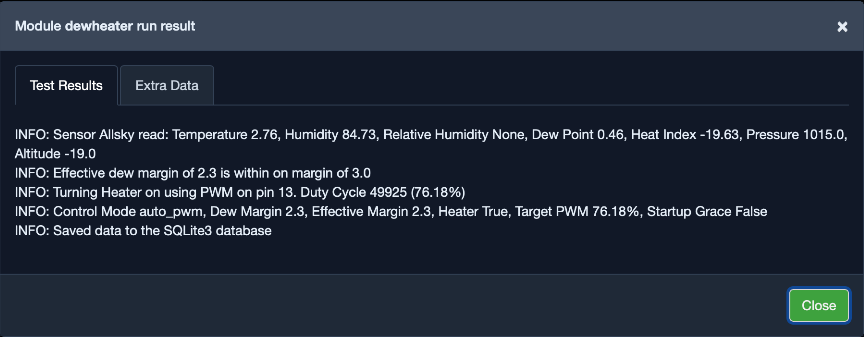
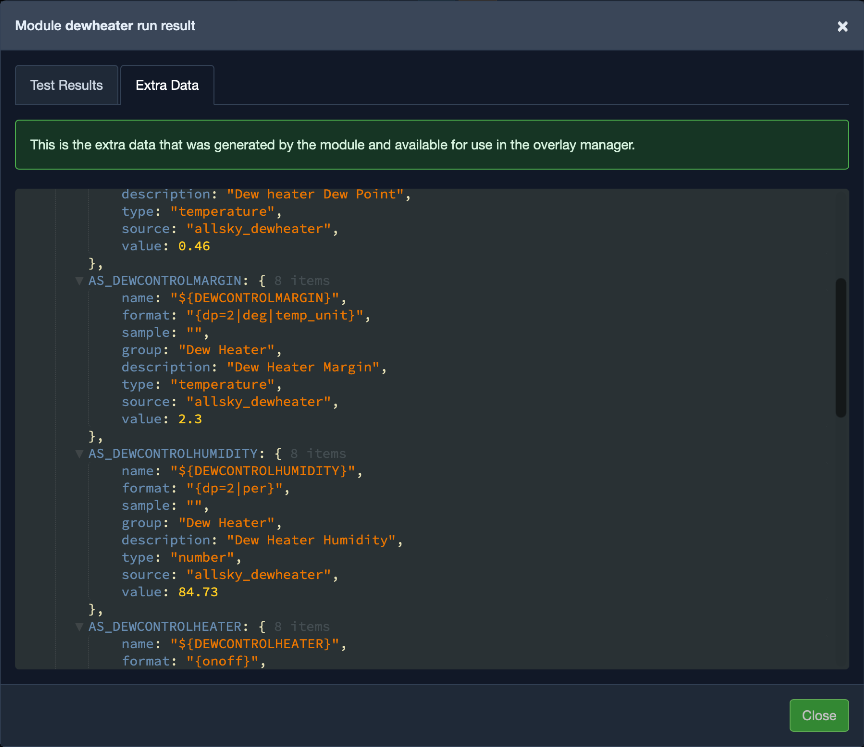
Some modules provide a test button. This is one of the quickest ways to confirm that the module is correctly installed and that its current settings make sense. Running a test does not replace adding the module to the correct pipeline, but it does let you check the module logic immediately instead of waiting for the next normal capture cycle.
If the test succeeds, you will usually see a result message and sometimes extra data generated by the module. If it fails, the test output can save a lot of time because it often points directly to the problem, such as a missing API key, unreachable device, or invalid parameter value.
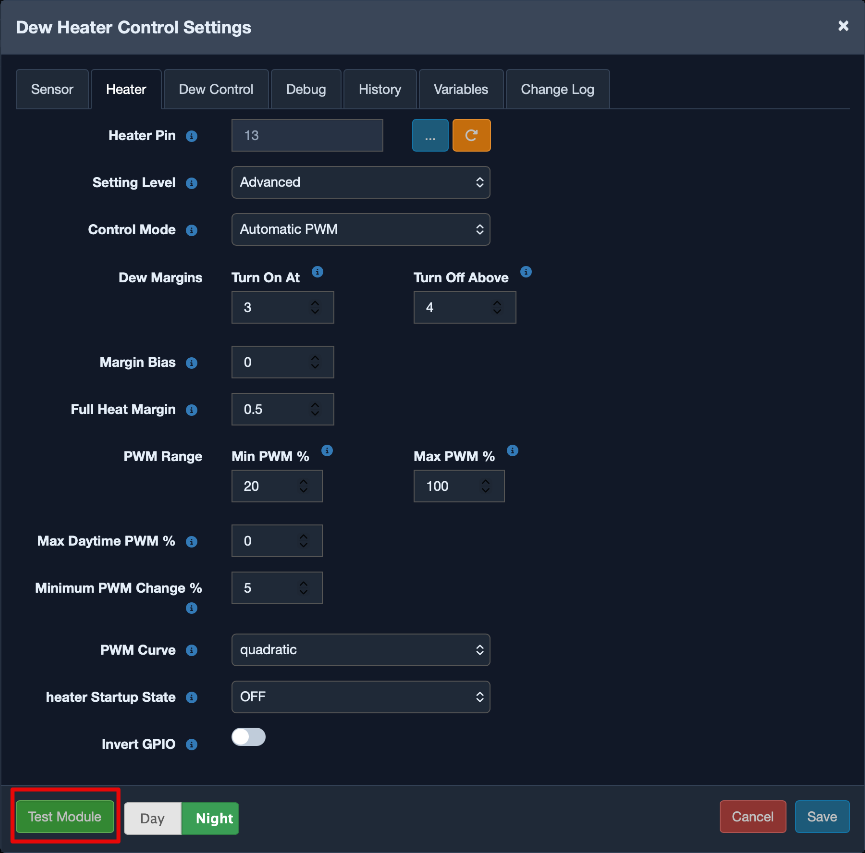
Use the test button when it is available to confirm that a newly installed module is working before you wait for the next scheduled run.
 |
 |
|---|---|
| The result tab shows whether the module ran successfully. | Some modules also show the extra data they generated during the test run. |
Good Practice
A careful workflow will save you trouble. Install one module at a time, configure it properly, and verify that it works before adding more. If you install several modules at once and then something goes wrong, it becomes much harder to tell which change caused the problem.
It is also a good idea to think about overlays while you are installing modules. Many modules exist primarily to generate values that can be shown on the image. If that is your goal, remember that installation alone is not enough. You must also add the relevant variables to your overlay after the module has been installed and enabled.
Finally, do not ignore warnings about deprecated or experimental modules. Deprecated modules may still install, but they are on the way out and may stop being maintained. Experimental modules can be useful, but they may require more troubleshooting and a better understanding of the logs.
Recommended habit
Install one module, place it in the flow, save the flow, test it, and only then move on to the next module.
FAQ
I installed a module, but nothing happened
This usually means the module was installed correctly but has not yet been added to a pipeline. Open the Module Manager, choose the correct flow, drag the module into the selected list, configure it, enable it, and save the pipeline. If the module produces overlay data, also make sure those variables have been added to your overlay.
The module appears in the package manager, but I cannot see it in my pipeline
First check that the module supports the pipeline you are trying to use. Not every module is available in every flow. If the module has just been installed, refresh the Module Manager and make sure you are looking at the right pipeline. If it still does not appear, review the installation output for errors and check the Allsky logs.
I updated a module and now it behaves differently
That can happen if the new version changed settings, dependencies, or exported variables. Open the module settings and review the configuration carefully. The Changelog tab is the first place to look because it often explains exactly what changed. If the module feeds an overlay, check that the expected variables still exist and that the overlay is still using the right names.
The package manager says a module is deprecated
This means the module author or the Allsky project no longer recommends new use of that module. In many cases there is a newer replacement that does the same job in a better way. Read the deprecation information in the module settings or documentation and plan to move to the suggested replacement instead of building new setups around the old module.
A hardware module installed successfully, but it still does not work
Successful installation only tells you that the software files and dependencies were installed. It does not prove that the sensor or device is wired correctly, powered correctly, or supported by your hardware setup. Check the wiring, verify that the device is detected by the Pi, and then use the module test function or the logs to see what is failing.
The module test fails even though installation completed
A completed installation only confirms that the package manager finished its work. The test can still fail if the module needs additional configuration, such as an API key, a device address, a GPIO pin, or network access. Review every required setting in the module dialog and make sure any external service or hardware the module depends on is reachable.
I want to stop using a module for a while. Should I uninstall it?
Usually no. If you may need the module again, just disable it in the Module Manager. That keeps your settings intact. Uninstalling is better when you are certain the module is no longer needed and you want to remove its files from the system.
A module used to provide overlay data, but the field is now blank
That usually means one of three things: the module is disabled, the module is no longer in the active pipeline, or the overlay is using a variable that no longer exists after an update. Check the module status first, then confirm the module still runs before the overlay step, and finally review the Variables tab for the current variable names.
The package manager does not offer the module I expected
Make sure you are looking in the official module list and that the module has not been deprecated or replaced. Some advanced or development-only options may only be visible on specific branches or in debug mode. If you are following older instructions, it is possible that the module has been renamed or merged into a newer one.